Part II
To know about the Basics and Advantages of using Visual Studio
Workflow
read this article.
In this
article, we will how to Create a Simple Sequential
Workflow Console Application.
Steps:
1. Open
Microsoft Visual Studio -> File -> New Project -> Select Visual C#
-> SharePoint -> Workflow -> SequentialWorkflowConsoleApplication

2. You can see the required DLL’s added in the
solution for running the work flow in the Solution Explorer

3. From the Toolbox -> Select Code -> drag
and drop inside the designer view as shown below. Double Click on the
codeActivity1 -> you will be navigated to Code behind page of the solution.


4. I have
initialized a variable with get and set methods and activity for the code1 as
shown below:

5. Now, go
to the Design view -> From Toolbox -> Drag and drop IF ELSE activity and the code activity for
IF and ELSE branch

6. Right
click on codeActivity2 and click Generate handlers to create handlers the activity
and do the same for codeActivity3

7.
Now, we will set the condition for the ifElseActivity1 and 2. Right Click on
ifElseActivity1 -> Properties -> Condition ->
Select Declarative Rule Condition

8. Give the
Condition Name and then Click on Expression for
setting the condition:

9. Following are the conditions set for both the
activities:


10.Now,if you click on any one of the activity -> properties -> select the name
then -> you can see the two conditions being used in the solution as shown:

11.
Finally, I have added the message to be returned for the both activities

12. Now
build the solution and then execute the code:


Here is the full solution. Click to download. Happy
Sharing!
Hope, you have enjoyed this article.
Please free to comment and share this article, if it
helps you!
Happy Coding!!
Visual Studio Workflow in SharePoint
Part I
To
know about the Basics of Workflow in
SharePoint, read this article.
To
know about the Creating a Designer Workflow,
read this article.
To
know about the New Features added in SharePoint Designer 2010, read this article.
In
this we will learn about Basics of Visual Studio Workflows in SharePoint.
Windows Workflow Foundation -WWF:
Windows Workflow Foundation (WF) is a
Microsoft technology for defining, executing, and managing workflows.
Why Visual Studio Workflow is necessary?
From
the business perspective, we need some custom workflows to be designed and
developed in order to meet the requirements. By using designer, we cannot
achieve all the custom actions and hence Visual Studio workflows are necessary.
Moreover,
Visual Studio is a known environment to the developers (working with Microsoft
Software’s) and hence the design and development is very easy.
Software Requirements
Ø Visual Studio 2005 Extensions for
Windows Workflow Foundation Download
Limitations of using Designer Workflow:
Limitations of using Designer Workflow:
Ø A major disadvantage is that, you
can create only Sequential Workflows using designer and not the State Machine
workflows.
Ø We cannot write custom code and
custom activities for workflows while creating using designer.
Ø Maintenance and upgradeable methods
are very less.
To know how to create a sample Sequential Workflow using Visual Studio, read this article Visual Studio Workflow in SharePoint.
Sunday, April 22, 2012
New features of SharePoint Designer 2010
Read this article, to know the Basics of Workflow in SharePoint.

When you create a workflow, you will see the following new options in the ribbon which makes the user to create and trouble shoot the workflow in SharePoint very easily.

Read this article, to know about Implementing Designer workflow in SharePoint using SharePoint designer 2007.
In this article, we will come to know about the new features added in the SharePoint designer 2010 for the workflow.
What is new in workflows in SharePoint Designer 2010?
In the SharePoint 2010 designer you will see a ‘ Work flows’ tab in the ribbon on the top. Now you can create three types of workflow in SharePoint 2010 using designer 2010:

Ø List Workflow – This is associated with a specific list or libraries in SharePoint.
Ø Reusable Workflow
– This type of workflow can be associated with multiple lists or
content types. It is more flexible than the List workflow type. Later
this content type can be used with a list. One more advantage of this
type of work flow is you can import it to Visual Studio and we can write
code to enhance this type of workflow.
Ø Site Workflow
– This workflow is not associated with any lists or site content types
and can be started from All Site content in the page i.e., it operates
on the site level.
Now let us know about the new options for implementing the workflow in SP 2010 designer. Particularly in the ribbon interface.

- Save button – Now you can save the workflow. This option was not available in SharePoint Designer 2007.
- Publish button – By clicking the publish button, you can publish the workflow to the SharePoint site.
- Condition – Here you can implement the conditions for the workflow.
- Action – Here you can add multiple actions when a specific condition occurs in the workflow.
- Export to Visio – Using this option, you can convert a workflow and show it in a diagrammatic representation to the user which gives clear understanding, actions, process, people involved and status of the workflow.
- Initiation Form Parameters – you can define the starting parameters for the workflow.
- Local Variables – Here you can define the internal variables of the workflow using this option.
Workflow using SharePoint designer 2007
To know
about the basics of the Work flows in SharePoint,
read this article.
In this
article, we will learn how to create a designer workflow in SharePoint designer 2007.
Scenario:
1. Create a workflow in SharePoint
designer 2007
2. This workflow should be automatically triggered when an item is created or
updated in a SharePoint Document library
3. When the workflow is initiated, then the document
created or updated in the document library should be copied to another document library
4. Also, we will have parameter (flag) in the document library whether
to move or not in the document library.
Solution:
We will create
two document libraries named, “Draft Library” and
“Publish Library”.
In the
Draft Library we will create an additional column named Move to Publish Library of type Choice menu (YES or NO)
When a
document is uploaded or updated in Draft Library with the flag value equals to yes, then the workflow should
be triggered which will copy the item
to the Publish Library.
Steps:
Open the
SharePoint site in the designer and click on File -> New -> Workflow


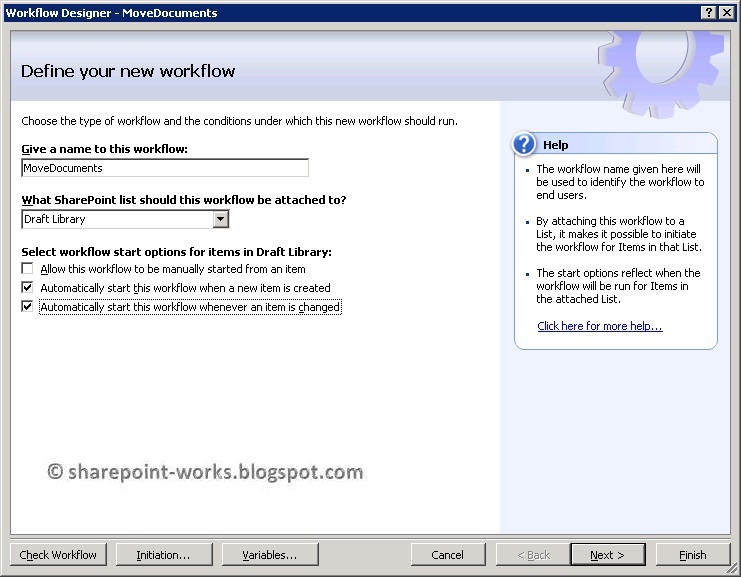
Click on the completed in the document library where you will be navigated to the workflow information as shown below:


Give the
name of the workflow and Select the document library for the workflow to be
associated (Draft Library in our case). Then Select two options Automatically starts the workflow when an item is created
or change and click on Next.
In the Step1,
click on the conditions and select Compare Draft Library field

Now, select
the Move to Publish Library column and Value equals to Yes as
shown below


Now we will
apply the action for the workflow. Click on Actions -> Copy List Item.

Now select
Draft Library to Publish Library in the values as shown below

Once you
click on finish, then the workflow will be associated to the “Draft Library”.

Navigate to
the SharePoint Document library and when you check the workflow settings, and
then you will see the MoveDocuments
workflow associated with the Draft document library.

Now, we
will test the workflow. Go ahead and upload
a document into the “Draft Library”. Select YES
in the Move to Publish Library option as shown below:

Now, our
workflow will be initiated and you will see the status of the workflow (completed) in the document library as shown
below:

Click on the completed in the document library where you will be navigated to the workflow information as shown below:

Now,
navigate to the publish library, you will see the document being copied as
result of the workflow as shown below:

Now, at the end of this article we
have learned the following from this article:
1. Creating
a Designer workflow in SharePoint using SharePoint designer 2007.
2. Used
workflow to copy an item form one document library to another document library.
To know about the new features added in SharePoint Designer 2010, read this article.
To know about the new features added in SharePoint Designer 2010, read this article.
Workflows in SharePoint
What is
a Workflow in SharePoint?

2. State-Machine workflow

Ø
In
simple words, we can say workflow is a serious
of activities occurs in steps which will produce an output at the final step.
Ø
In
SharePoint, workflow is an automated movement of
documents or items through a sequence of actions or tasks that are
related to a business process.
Ø
Business process
is a sequence of steps that occurs on a document or a task or an item and finally produces
a result as an outcome.
Types of
Workflows
Basically,
there are two fundamental types of workflows in the SharePoint:
1. Sequential workflow
It
represents the steps that execute in order
until the completion of last activity. It is represented graphically in
flowchart with start, end and all the sequential activities in between.
Example

2. State-Machine workflow
It
represents a set of states, transitions and actions.
As sequential workflows, it does not have
prescribed execution flow and need not have an end. It can have any
number of states and transition and it can any items related to any transition.
Example

The
different types of workflow in the various versions of SharePoint present by
default are listed below:


Ways for
creating workflows in SharePoint
The
different ways of creating the workflows in SharePoint are as follows:
1. In SharePoint site directly
2. SharePoint Designer
3. Microsoft Visual Studio with workflow extensions installed (WWF- Windows Workflow Foundation) –
basically called custom workflows
What are
the pre-requisites for creating a workflow in SharePoint?
1. There should be a at least one list or document library to create and
associate a workflow.
2. If you do not have a single list or document
library in your site, you will be prompted
for creating a list or library.
3. If you want your workflow to be
associated with custom columns or settings
in the site, then those changes should be made before you create the workflow
so that it will be available in the designer.
Advantages
Ø
Allow
the business activities to be automated,
enabling actions such as document review, approval,
issue tracking and signature collection.
Ø
Allow
the document to be routed to one person to another
for approval by assigning a task to each person. This is followed by
analysis, review, and approval and finally the document is published. Hence making
the document management easier.
Ø
Also
improves the collaboration in an enterprise.
Comments