Introduction:
Microsoft
has introduced a new social feature called “Micro blogging” in
SharePoint 2013 to enhance the social networking and collaboration features.
This
powerful feature is added as an OOTB web part to SharePoint 2013 and ready to
useJ
So, what is micro blogging?
It
is a type of blog which allows users to share their updates. This updates are
called micro posts and the use of this services is called micro blogging.
Ref:
http://www.webopedia.com/TERM/M/microblog.html
Micro blogging in
SharePoint 2013
The
SharePoint Micro Blogging feature is like Facebook and Twitter which allows the
users to communicate with others easily, by posting some questions, responding,
comments and etc.
Following
are the list of features:
Ø Update picture and links in
the posts and replies
Ø Participate in a conversation by posting comments (with rich media and
Links in the post) and
replied
Ø Use mentions (@) to tag a user in a post and in the replies
Ø Use tags (#) to define
keywords so that the users can follow and search for the same topic easily
Ø Like a post, follow
people, documents, sites and tags
Also,
the author’s (one who posts an update or comment or reply for a post)
presence
(online, off-line, busy, in a meeting) are also displayed.
Add the Site Feed web part to the page:
Edit
the page -> Insert -> Web part -> Social Collaboration -> Site Feed

Once added, you will see a dialogue to post your feeds as shown below:

Add a new Post in the Micro blog:
You can add a post by typing your post in the text box and hit post to update your post
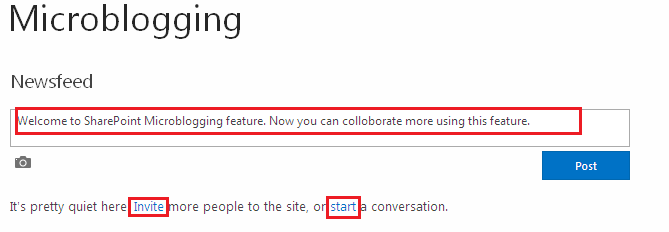
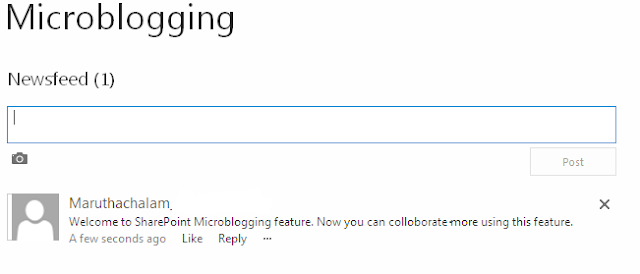
In the Post you can add Rich media such as Image, Video, Links, etc.. Also, you have options of deleting the post.

Like, Reply, Copy Link to conversation, Follow up, Lock
Conversation:
Like other social
networking as I mentioned earlier in this post you have options of Like,
Reply, Copy Link to Conversation, Follow up and Lock a Conversation :)
Also, there is an option "Show More Posts" to view the old posts.


Tagging a User and Topic
The options of Tagging a
user by "@" allows the other user to specifically tag a post to a user
and also Tagging a topic by "#" allows the posts to be categorized and
also it helps in searching the posts easier.


This micro feed are
based upon the User Profile Service in SharePoint. This feeds are stored
in a list called Micro Feed by default where you will see all the
details stored.
Navigate to the following path to view the Micro Feeds:
Check for the Micro Feed List

Clicking on the List, you will see a List with different columns which stores the feeds.

Hope you enjoyed the
post. Feel free to share your valuable comments which always make me to
write more. Also share this post to your friends if it is helpful.
Web Part with Custom Tool Part in SharePoint
To know about Basics of Creating a Custom Web Part with Validations and Deploying it in the SharePoint, read this article.
In this article, we will know how to create a custom web part in SharePoint with Custom Tool Part (Custom Properties).
Before creating a custom web part with custom tool part, we will know about the basics of Custom Tool Part in SharePoint.
Before creating a custom web part with custom tool part, we will know about the basics of Custom Tool Part in SharePoint.
What is custom tool part?
The Custom tool part is part of the web part infrastructure, which helps us to create a custom user interface for the web part properties which is different from default property pane.
Difference between Standard Tool Box and Custom Tool Part Properties
Below is the difference between the Sandbox and Custom Tool Part properties in a web part:
Sand Box Tool Box Properties:This is the tool box that comes by default and it contains Text Boxes, Check Boxes and Drop down lists to fill or select the data. But this tool box does not contain any dynamic controls for displaying the dynamic data from the SharePoint list or libraries. This is something like hard coding the values in the .cs file of the web part.
Custom Tool Part Properties:With the Custom tool part or tool box can contain any asp controls in it and it can bind the data to from the database or list and libraries. Hence displaying the dynamic values or data is possible using this tool box.
List of attributes used for creating a Custom Tool Part

Two Classes used in the Web Part Tool Pane Creation
CustomPropertyToolPart – used to show and modify the custom properties created in the web part.
Please feel free to share your thoughts and share this post if it helps you!Monday, June 4, 2012
Creating and Deploying Custom Web Part in SharePoint
In this
article, we will learn how to create a Custom Web Part in SharePoint using
Visual Studio.
After
reading this article, you will learn the following:
Ø
Creating
custom web part using visual studio
Ø
How
to use Labels, Rich text box and Buttons
(with events) and validation
controls in the custom web part?
Ø
How
to validate the fields in custom web part in
SharePoint?
Ø
How
to deploy the web part in SharePoint site?
Scenario:
Suppose
that in a SharePoint page, you want the users to comment about the page or send
some feedback, and then you can use this web part.
Solution:
It is
created the following solution using Visual Studio
2005.
Steps:
1. Open the
Visual Studio -> Click File -> New project -> Select Visual C# from
Project types -> SharePoint -> web Part (Use this link for downloading the Visual Studio Extensions for SharePoint for
creating SharePoint solutions in the Visual Studio 2005)
 2. Once
created, delete the web part present in the solution named webpart1. Now click
on the Project Solution -> Add -> New Item -> SharePoint -> Web
Part -> Give the name as CommentWebPart -> Click Add to create a web part
file in the project solution
2. Once
created, delete the web part present in the solution named webpart1. Now click
on the Project Solution -> Add -> New Item -> SharePoint -> Web
Part -> Give the name as CommentWebPart -> Click Add to create a web part
file in the project solution
 3. Now, we
will create controls and add in the web part. See the following code which is
used for creating this web part.
3. Now, we
will create controls and add in the web part. See the following code which is
used for creating this web part.


Program.cs:
using System;
using System.Runtime.InteropServices;
using System.Web.UI;
using System.Web.UI.WebControls;
using System.Web.UI.WebControls.WebParts;
using System.Xml.Serialization;
using Microsoft.SharePoint;
using Microsoft.SharePoint.WebControls;
using Microsoft.SharePoint.WebPartPages;

namespace CommentWebPart
{
    [Guid("745a216c-1126-4000-a189-02ebc60d7e67")]
    public class CommentWebPart : System.Web.UI.WebControls.WebParts.WebPart
    {
        TextBox txtContactName;
        TextBox txtEmailAddress;
        InputFormTextBox txtBox;
        Button btnSubmit;
        Button btnCancel;
        Label lblSpace;


        public CommentWebPart()
        {

        }

        protected override void CreateChildControls()
        {
            try
            {
                base.CreateChildControls();

                Table t;
                TableRow tr;
                TableCell tc;

                // Creating a table to add the controls in it
                t = new Table();

                // Label for contact name
                tr = new TableRow();
                tc = new TableCell();
                tc.Style["padding-top"] = "5px";
                tc.VerticalAlign = VerticalAlign.Top;
                Label lblConatctName = new Label();
                lblConatctName.Text = "Conact Name";
                tc.Controls.Add(lblConatctName);
                tr.Controls.Add(tc);


                // Text box for contact name
                tc = new TableCell();
                tc.VerticalAlign = VerticalAlign.Top;
                txtContactName = new TextBox();
                txtContactName.ID = "txtContactName";
                txtContactName.Width = Unit.Pixel(250);
                tc.Controls.Add(txtContactName);

                /* Creating required field validator for Contact Name.
                * If the value is empty, then should throw error on clicking button Submit*/

                RequiredFieldValidator objName = new RequiredFieldValidator();
                objName.ControlToValidate = "txtContactName";
                objName.ErrorMessage = "Conatct Name cannot be empty";
                tc.Controls.Add(objName);
                tr.Controls.Add(tc);

                t.Controls.Add(tr);

                // Label for email id
                tr = new TableRow();
                tc = new TableCell();
                tc.VerticalAlign = VerticalAlign.Top;
                Label lblEmailId = new Label();
                lblEmailId.Text = "Email ID";
                tc.Controls.Add(lblEmailId);
                tr.Controls.Add(tc);

                // Text box for email id
                tc = new TableCell();
                tc.VerticalAlign = VerticalAlign.Top;
                txtEmailAddress = new TextBox();
                txtEmailAddress.ID = "txtEmailAddress";
                txtEmailAddress.Width = Unit.Pixel(250);
                tc.Controls.Add(txtEmailAddress);

                /* Creating required field validator for Email ID.
                * If the value is empty, then should throw error on clicking button Submit*/

                RequiredFieldValidator objEmailID = new RequiredFieldValidator();
                objEmailID.ControlToValidate = "txtEmailAddress";
                objEmailID.ErrorMessage = "Email Id cannot be left empty";
                tc.Controls.Add(objEmailID);
                tr.Controls.Add(tc);

                /* Creating Regular Expression validator for Email ID.
                * If the value is empty or not in a regular Email ID format,
                * then should throw error on clicking button Submit*/

                RegularExpressionValidator objEmail = new RegularExpressionValidator();
                objEmail.ControlToValidate = "txtEmailAddress";
                objEmail.ErrorMessage = "Email Id is not in the correct format";
                objEmail.Display = ValidatorDisplay.Dynamic;
                objEmail.ValidationExpression = @"^([0-9a-zA-Z]([-.\w]*[0-9a-zA-Z])*@([0-9a-zA-Z][-\w]*[0-9a-zA-
                Z]\.)+[a-zA-Z]{2,9})$";
                tc.Controls.Add(objEmail);
                tr.Controls.Add(tc);

                t.Controls.Add(tr);

                // Label for text box
                tr = new TableRow();
                tc = new TableCell();
                tc.VerticalAlign = VerticalAlign.Top;
                Label lblComments = new Label();
                lblComments.Text = "Comments";
                tc.Controls.Add(lblComments);
                tr.Controls.Add(tc);


                // Creating a rich text box for comments
                tc=new TableCell();
                tc.VerticalAlign=VerticalAlign.Top;
                txtBox=new InputFormTextBox();
                txtBox.ID="txtBox";
                txtBox.RichText = true;
                txtBox.RichTextMode=SPRichTextMode.FullHtml;
                txtBox.TextMode=TextBoxMode.MultiLine;
                txtBox.Rows=10;
                txtBox.Width=Unit.Percentage(100);
                txtBox.Height = Unit.Percentage(30);
                tc.Controls.Add(txtBox);
                tr.Controls.Add(tc);

                t.Controls.Add(tr);

                // Creating empty cell for spacing
                tr = new TableRow();
                tc = new TableCell();
                lblSpace = new Label();
                lblSpace.Text = "   ";
                tc.Controls.Add(lblSpace);
                tr.Controls.Add(tc);

                tc = new TableCell();

                // Creating button submit event
                btnSubmit = new Button();
                btnSubmit.ID = "btnSubmit";
                btnSubmit.Text = "Submit";
                btnSubmit.Click +=new EventHandler(btnSubmit_Click);
                tc.Controls.Add(btnSubmit);

                // Creating button cancel event
                btnCancel = new Button();
                btnCancel.ID = "btnCancel";
                btnCancel.Text = "Cancel";
                btnCancel.Click +=new EventHandler(btnCancel_Click);

                lblSpace = new Label();
                lblSpace.Text = "   ";
                tc.Controls.Add(lblSpace);
                tr.Controls.Add(tc);
                tc.Controls.Add(btnCancel);

                tr.Controls.Add(tc);

                t.Controls.Add(tr);

                this.Controls.Add(t);

            }
            catch (Exception ex)
            {
                string err = "Error Occured while loading the web part" + ex.Message;
            }
      }

        protected void btnSubmit_Click(object sender, EventArgs e)
        {
            try
            {
                // Creating the EMail message
                System.Text.StringBuilder txtMessage = new System.Text.StringBuilder();
                txtMessage.Append("Contact Name: ");
                txtMessage.AppendLine(txtContactName.Text);
                txtMessage.Append("Email Address: ");
                txtMessage.AppendLine(txtEmailAddress.Text);
                txtMessage.AppendLine();
                txtMessage.AppendLine("Comment:");
                txtMessage.AppendLine(txtBox.Text);

                // Creating the Email subject message
                System.Text.StringBuilder txtsubject = new System.Text.StringBuilder();
                txtsubject.Append("Comment from");
                txtsubject.Append(txtContactName.Text);

                // Cerating the message header
                System.Collections.Specialized.StringDictionary txtmessageHeader = new
                System.Collections.Specialized.StringDictionary();

                // To whom the mail should be sent
                txtmessageHeader.Add("to", "MAIL ID OF THE USER TO WHOM THE COMMENT HAS TO BE SENT");

                // From whom the comment is being sent
                txtmessageHeader.Add("from", txtEmailAddress.Text);
                txtmessageHeader.Add("subject", txtsubject.ToString());
                txtmessageHeader.Add("content-type", "text/RichText");

                // Send the email with the comment from the user
                Microsoft.SharePoint.Utilities.SPUtility.SendEmail(SPContext.Current.Web, txtmessageHeader,
                txtMessage.ToString());

                // Clear the fields after sending the mail
                txtContactName.Text = "";
                txtEmailAddress.Text = "";
                txtBox.Text = "";

            }
            catch (Exception ex)
            {
                string str= "Unable to send mail:" + ex.Message;
            }
        }

        protected void btnCancel_Click(object sender, EventArgs e)
        {
            // Clear the fields on clicking cancel
            txtContactName.Text = "";
            txtEmailAddress.Text = "";
            txtBox.Text = "";
        }

   }
}
4. Build
the web part and check for errors.
5. Now, to deploy the solution Right Click on the project
solution -> Select Deploy to add the solutions in the Solution Gallery.


6. Now the
solution will be present in the Solution Gallery
(Central Administration-> Operations -> Solution Management) in the
SharePoint site and we have to add it to our site.
7. Go to the
SharePoint site -> Site Actions -> Site Settings -> galleries ->
web parts


8. Now,
Click on New -> You will see the list of deployed web parts and click on
Comment Web part and then Click Populate Gallery

 9. Now the
web part is available in the SharePoint site but we have to add Safe control
entry in the web.config of the site.
Add the following in the web.config in the SAFE CONTROLS tag section
9. Now the
web part is available in the SharePoint site but we have to add Safe control
entry in the web.config of the site.
Add the following in the web.config in the SAFE CONTROLS tag section

10. Now you
can add the created custom web part in your SharePoint site. This will look as
follows:
 According
to the required field validation, if
the name and email id is field is left empty then
the following screen should be seen:
According
to the required field validation, if
the name and email id is field is left empty then
the following screen should be seen:
 If the
Email ID is given in the wrong format then
according to the regular expression validation, the following screen should be
seen:
If the
Email ID is given in the wrong format then
according to the regular expression validation, the following screen should be
seen:
 If the
input fields are correctly given, then you will be able to submit the
If the
input fields are correctly given, then you will be able to submit the


comment
to the described mail ID in the code as shown below:
 HAPPY SHARING J

Also, to know about the Basics of Visual Web Part read this article.
To know about Creating and Deploying a Visual Web Part
using Visual Studio 2010 read this article.
Please free to share your thoughts and share this post if this helps you!
Inserting a web part into SharePoint page without designer
In the
article “Inserting
a web part into SharePoint Page without designer”, we have discussed about
inserting a web part in New/Edit/Display from.aspx
in without using designer the lower versions of SharePoint (WSS
3.0 and MOSS
2007).


Now, in
this article we will discuss about inserting a web part into the New/Edit/Display
form.aspx page without designer in SharePoint 2010.
Now,
suppose that we have custom list named “City”

Now,
go to the List Settings of the custom list “City”

Under
General Settings -> Advanced Settings
In the
advance settings, we have an option for the Launching the forms in dialog when
click on NEW for inserting a new value in a
list.
Here, now
we will disable that option by selecting NO
in launch forms in a dialog as shown below:

Now, we
will click on “New Item” for inserting a new item in the custom list
Now, we
will be navigated to the newform.aspx without popup dialog since we
have disabled it.
The URL in
the address bar will be as below:
In the
above URL delete the URL before NewForm.aspx, we will have
In this URL
in the address bar, append “?ToolPaneView=2”
Click Go in
the address bar, then you will see the Add Web Parts option for inserting into the
newform.aspx page.

In the
similar way, we can insert the web part into editform.aspx and displayform.aspx
SharePoint Web Part Maintenance Page
In this post, we will come
to know how to navigate to the web part maintenance
page.
Why we need this page in SharePoint
?
In the webpart maintenance
page, we will see the web parts present in a
SharePoint page.
By adding “?contents=1”
at the end of the page URL, you can navigate to the web part maintenance page.
For Example:
Here, you can see the web
parts present in the SharePoint page and you can delete the web parts if it is
corrupted or not used in the particular page.
Advantage:
There will be scenarios like;
you will get an error while opening the SharePoint page in the SharePoint
designer. Read this article to know more Deafult.aspx
is not opening in the SharePoint Designer
Creating and Deploying a Visual Web Part using Microsoft Visual Studio 2010
To know about the Basics of Visual web part, read this article before knowing how to create and deploy the visual web part using visual studio 2010.
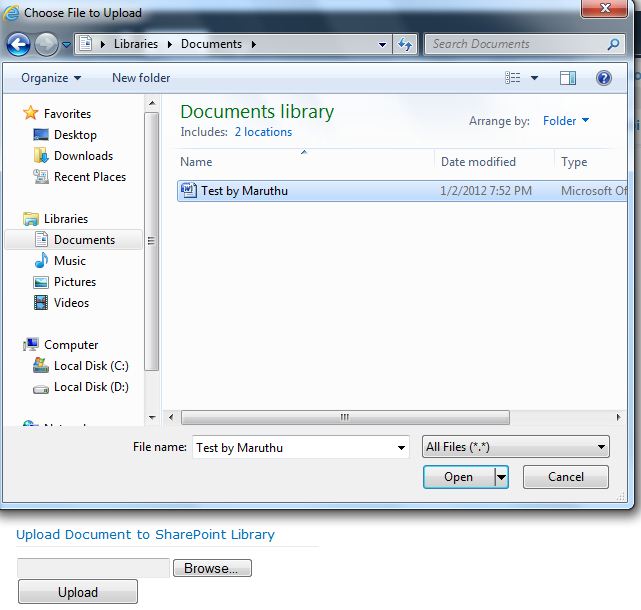
Open the Visual Studio and create a Visual Web Part project as shown below


Once Clicked Upload, the document is uploaded into the document library as shown below.


We will create a Visual web part for uploading the document to the SharePoint document library.
At the end of this article, we will learn
1.How to create and deploy a Visual Web part
2.How to programmatically upload a document to the SharePoint Document library
Open the Visual Studio and create a Visual Web Part project as shown below

When you click OK, you
will see a pop-up window which will ask for the SharePoint site where
the web part is going to be deployed as shown below. Hence give the
proper URL of the SharePoint site. Also select the option Deploy as a farm solution because, visual web part is not a sandboxed solution

Once clicked Finish, you
will see the project created with all the necessary files (assembly,
.ascx files, feature to be deployed, .web part file) for a web part in
the solution explorer as shown below

Click on the .ascx file
and in the design mode, drag and drop the controls (FileUpload Control
and Button) as shown below and complete the design part
I have added a JavaScript code which we used in this article for validating the file being uploaded is only .doc and .docx file.

Now, we will go for the
coding the functionality of the web part. I have added a code in the
Button1_Click event (Upload) of the web part as shown below

In the above code, give the proper name of the Document Library. I have used the default document library “Documents”.
Now Build the
application and check for the errors. Once the build is successful, our
web part is ready to be deployed in the SharePoint site.
It is very easy to deploy the visual web part. See the screenshot below.

That’s it. We have deployed our solution to the SharePoint site, which we have mentioned during creating the project.
Now, we will use the web part in our share point page.
Go to the SharePoint
page -> Edit Page -> Insert web part -> Categories -> Custom
-> Select the web part created (in our case I have named
visualwebpart1)

Once added, we will see our web part designed in the SharePoint site page.

I will select a file and click upload. The file will get uploaded into the document library mentioned in the code.

That’s it! We are done. We have learned to create and deploy the visual web part in SharePoint 2010.
Basics of Visual WebPart in Microsoft Visual Studio 2010
In this article, we are going to discuss about an interesting feature of Microsoft which is called Visual Webpart.

See also, how to create a Visual Web Part and deploy the solution in SharePoint 2010 in this article.
Web parts play an important role in the SharePoint design and development.
In the lower versions of SharePoint, we have to write the code for designing the webpart and then the custom code for its function.
But
with the introduction of Visual Studio 2010 and SharePoint 2010
improved the way of creating and deploying the web parts in SharePoint
(which is drag & drop the controls and design easily).
What is Visual Webpart?
In simple words, visual webpart is the wrapping the web user control (.ascx page) within a web part.
Hence,
the Web Part class will load a User Control in the Web Parts
CreateChildControls() method and this user control is what you can drag
and drop your controls to design the webpart. The Visual Studio
interface nicely makes these operations seamless and takes care of all
the wiring for deployment.
I will diagrammatically represent the visual web part

Advantages
1. Design of the web part is very easy, since it involves only drag and drop of the controls
2. No need to use the STSADM commands for adding an deploying the solution to the SharePoint site, since it involves only single click to deploy the solution
3.
When we want to alter the design or change the code due to some bugs,
we can make the changes-> re-build the solution-> deploy from the
development environment which will automatically make the changes in the SharePoint site and even in the web part added in any of the pages
See also, how to create and deploy a Visual Web Part using Microsoft Visual Studio 2010 in this article.
See also, how to create a Visual Web Part and deploy the solution in SharePoint 2010 in this article.
Implementing Federated Search Result (Twitter) in SharePoint 2010
In this article, we will discuss how to implement the Federated Search results in SharePoint 2010.
Steps
Go to Central Administration of the SharePoint Server -> Application Management -> Manage service applications

You will
see a list of services. In that Select Search Service Application
Clicking on
this, you will be re-directed to the Search Server Administration page. In the
left navigation, you will see some menus as shown below. Select Federated
Results in the left navigation menu.

You will
see a page, where you will find options for creating a New Location for Federated search or you can
import the FLD file through Import
Location option.

Clicking on
the New Location option you will see the following page, where we will
configure your Federated Location as shown below


That’s it.
I have added the FLD file at the end of the article, for download so that you
can download and import the file and work on it.
Now, we
have configured the New Location and hence we will use the created Federated
Location in the Search Center.
I have
created a Search Center as shown below. First give a search query and in the
results page, we will add the Twitter Results federated location.

In the search result page, edit the page and you will see options for
adding the web part as shown below


After
adding the Federated Results webpart, configure the results as shown below.

That’s it. We
are done. Save the webpart and give a search keyword and test. You will be able
to see the results from the intranet and from the internet search results (here
Twitter).

You can
download the Twitter FLD file from here.
Enjoy
SharePoint using!
Comments