In
this article, we are going to discuss about another interesting topic called
Federated Search which came up with the MOSS (Microsoft Office SharePoint
Server), when Microsoft updated the Infrastructure in SharePoint.
Federation allows users to send the same query (search keyword) to multiple independent repositories, and display the results from each in its own region on a results page.
Advantages
1. It is helpful, when the search data is stored in the multiple repositories or to display results from various locations
2. We can bring the results from various social networking sites (Twitter, YouTube, Flickr etc.,) and search engines (Google, Bing, Yahoo, etc.,) easily in our search results page
3. Displaying the results from various sites and search engines allows the user to view the results from different source in a single page
4. We can display different types of results like Sites, Images, Videos, etc., This allows the users to interact with the site more easily.
Also, read about Configuring a Federated Results for Twitter in SharePoint 2010 and using it in this article.
What
is Federated Search?
Federate
- Characterized by unity or being or joined
into a single entityFederation allows users to send the same query (search keyword) to multiple independent repositories, and display the results from each in its own region on a results page.
Advantages
1. It is helpful, when the search data is stored in the multiple repositories or to display results from various locations
2. We can bring the results from various social networking sites (Twitter, YouTube, Flickr etc.,) and search engines (Google, Bing, Yahoo, etc.,) easily in our search results page
3. Displaying the results from various sites and search engines allows the user to view the results from different source in a single page
4. We can display different types of results like Sites, Images, Videos, etc., This allows the users to interact with the site more easily.
Disadvantages
1.If
we are using this federated search results in a corporate intranet, then there
will be security issue. This is because, all the search queries/keyword (which
may be confidential to a company) will be sent to the search engines. This
search engines will store the data for some time, even after querying the
results.
2. We
cannot crawl the results from the other sources (Search Servers) and store the index
Hope this helps you!Also, read about Configuring a Federated Results for Twitter in SharePoint 2010 and using it in this article.
How to hide the left navigation bar in the SharePoint
In this article, we will see how to hide the left navigation in SharePoint siteThere are many ways for hiding the left navigation in the SharePoint. Here is the simplest way to hide it.
1. Master.FindControl("PlaceHolderLeftNavBar").Visible = false;
2. Place a content editor in the page you want to hide the left navigation pane in the site and add the following code in the source editor which will hide the left navigation bar.
1. Master.FindControl("PlaceHolderLeftNavBar").Visible = false;
2. Place a content editor in the page you want to hide the left navigation pane in the site and add the following code in the source editor which will hide the left navigation bar.
<style>
.ms-navframe
{
display:none;
}
</style>
That’s it. We have easily hide the left navigation bar with a simple code.
Deploying Silverlight Application in SharePoint 2010
In the previous article, we have discussed about creating a simple Silverlight Application in Microsoft Visual Studio 2010.


Now, in this article we will discuss how to deploy the solution in the SharePoint 2010.
The New webpart feature added in the SharePoint 2010 and SharePoint Foundation 2010 is Silverlight which comes under Media and Content category.
The New webpart feature added in the SharePoint 2010 and SharePoint Foundation 2010 is Silverlight which comes under Media and Content category.
The Solution of the Silverlight application produces a package with extension .XAP
Note: The .xap file is a package which consists of the solution created in the Silverlight Application
Hence, copy the XAP file in the SharePoint Document library and copy the shortcut (Link) of the file.
Now go to the page where you want to deploy the solution.
Now go to the page where you want to deploy the solution.
Insert the Silverlight webpart as shown below


Now,
edit the webpart and in the URL property, browse for the .xap file
copied from the Shared Documents or copy the shortcut URL as shown below

Now save the page and you will see the silverlight webpart created as shown below

So, when you click the Click this button in the webpart, you will see the message box “This is a simple silverlight Application”

That’s it, we have deployed the silverlight application in the sharepoint 2010. Enjoy.
MediaWebPart in SharePoint 2010
In this article, we will discuss how to use the out of box webpart named "Media WebPart" in SharePoint 2010.


3. Now click on Edit the webpart to configure the media.
 5.
Go to Change Media option and there ae three options here. you link a
media from the SharePoint Library or from your local computer or from
any web address.
5.
Go to Change Media option and there ae three options here. you link a
media from the SharePoint Library or from your local computer or from
any web address.
 6.
Here I will insert from the local computer and click save the web part,
the web part is ready to use.You will see the media web part as shown
below.
6.
Here I will insert from the local computer and click save the web part,
the web part is ready to use.You will see the media web part as shown
below.
 I gave the option as Start Media Automatically in the Media Properties so that, it starts when the page loads.
Note : This webpart is prsent only in the SharePoint 2010 and SharePoint foundation.
Steps:
1. Go to the sharepoint where you want to add the media webpart.
2.
Go to Edit Page -> Insert -> WebPart (from the ribbon) ->
Categories (Media and Content) -> Select Media webpart and insert as
shown below

4. Once clicked Edit you could see various options such as Media, properties, Styles, Play Styles and Size.


Tip of the Day WebPart for SharePoint
Hi All,
I would like to share a link which allows you to download the Tip of the Day webpart for sharepoint.
You can download the webpart here.
Configuring the webpart is clearly explained in the site.
Embedding YouTube Videos to the SharePoint Site
Steps
1. Go to the YouTube site and navigate to the video which you like to embed in the SharePoint Application.
2. Click on Share button below the video as shown below

3. On clicking Share you will find two options as Mail or Embed as shown below

4. Copy the code from the Embed option as show above and save it in a notepad. I named it as youtubetest.txt
Code example in my case
<iframe width="560" height="315" src="http://www.youtube.com/embed/6986O9VA6LU" frameborder="0" allowfullscreen></iframe>
5. Upload the text file to SharePoint Document Library and right click on the file and
copy the shortcut from it.
copy the shortcut from it.
6. Now go to the SharePoint page where you like to add the YouTube video and edit
the page.
7. Click insert a web part -> add a Content Editor web part
8. Edit the web part and now add the shortcut of the youtubetest.txt path in the Content Link property of the web part or you can directly add the code which is copied from the YouTube site in the Source Editor property of the web part and save it.
8. Edit the web part and now add the shortcut of the youtubetest.txt path in the Content Link property of the web part or you can directly add the code which is copied from the YouTube site in the Source Editor property of the web part and save it.
You will get the following result.

You can place this web part in the Home Page of your SharePoint site.
Enjoy!
Twitter WebPart for SharePoint
I
have already posted a link which will guide you in creating the twitter
and Face book web parts for SharePoint in this article. Twitter and FaceBook for SharePoint. Have a look at this.
Yet another easiest way for twitter is as follows:
Steps:
1. Open the site page where you want to add the twitter widgets.
2. Add a Content Editor Web part.
3. Now open this URL in your browser
4. You will find 4 widgets (in the Widgets for my site option) which is provided by default in the Twitter Official Site
· Profile Widget
· Search Widget
· Faves Widget
· List Widget
5. All the information about the widgets will be given the site.
6. Now for example I will add the SEARCH WIDGET to our site. I click on Search Widget which will navigate to this link
7. You have 4 options such as Settings, Preferences, Appearance and Dimensions.
8. Here you can customize everything and my sample is shown code grabbed from the site is shown below.
<script src="http://widgets.twimg.com/j/2/widget.js">
</script>
<script>
new TWTR.Widget({
  version: 2,
  type: 'search',
  search: 'SharePoint',
  interval: 30000,
  title: 'What people are saying about',
  subject: 'SharePoint',
  width: 250,
  height: 300,
  theme: {
    shell: {
      background: '#8ec1da',
      color: '#ffffff'
    },
    tweets: {
      background: '#ffffff',
      color: '#444444',
      links: '#1985b5'
    }
  },
  features: {
    scrollbar: false,
    loop: true,
    live: true,
    hashtags: true,
    timestamp: true,
    avatars: true,
    toptweets: true,
    behavior: 'default'
  }
}).render().start();
</script>
9. That’s it!! Add this code in the Source Editor of the Content Editor Web Part.
10. This will display all the tweets with respect to the Query you gave in the Search. The webpart will look like this.

11. Save it!! Enjoy the Twitter integration in your SharePoint Site.
RSS Feeds WebPart
In
this post we will see how to create RSS feeds webpart for sharepoint.
it is very easy and we will learn it in the following steps.
1. Add a XML web part to a share point page where you want to add the RSS Feeds web part.
2. Edit the properties of the web part.
3. In the XSL editor place the code (given below).
4. In the XML link give the proper RSS feeds URL.
5. Click Save.
6. This will display the RSS feeds from the URL linked in the web part.
2. Edit the properties of the web part.
3. In the XSL editor place the code (given below).
4. In the XML link give the proper RSS feeds URL.
5. Click Save.
6. This will display the RSS feeds from the URL linked in the web part.
Code:
<?xml version="1.0" encoding="UTF-8"?>
<xsl:stylesheet version="1.0" xmlns:xsl="http://www.w3.org/1999/XSL/Transform" exclude-result-prefixes="xsl">
<xsl:output method="xml" omit-xml-declaration="yes" indent="yes"/>
<xsl:template match="/">
<div>
<xsl:apply-templates select="rss/channel"/>
</div>
</xsl:template>
<xsl:template match="rss/channel">
<xsl:variable name="link" select="link"/>
<xsl:variable name="description" select="description"/>
<ul><xsl:apply-templates select="item"/></ul>
</xsl:template>
<xsl:template match="item">
<xsl:variable name="item_link" select="link"/>
<xsl:variable name="item_title" select="description"/>
<xsl:if test="position() < 6">
<li>
<a href="{$item_link}" title="{$item_title}"><xsl:value-of select="title"/></a>
</li>
</xsl:if>
</xsl:template>
</xsl:stylesheet>
Displaying Multiple Document Libraries in a Single WebPart
A
frequent requirement in the Share Point Projects is Displaying Multiple
Libraries together in a single web part. It can be achieved by various
methods but I am going to create it through Share Point Designer 2007.
In this article we will come to know how it can be done step by step.
1. The Important thing here to be noted is, whatever may be the number of Document Library going to be merged here, and it should contain the same number of columns and name.
2. If not, this web part won’t work.
3. Create two document libraries (Example : Test1,Test 2)
4. I have created 4 columns such as Type, Title, Name, and Created by in both document libraries.
5. Now, we are going to use the designer 2007 here to proceed.
6. Open the site in designer –> create an .aspx page.
7. In the right side of the designer -> go to Data Source Library -> Linked Sources
 8. In the Linked Sources click -> create a New Linked Source.
 9. We have Three Tabs here ,
General
a. In General -> Give the Name of the web part
b. In Description-> Give the Description of your web part
c. In Key Words -> Give the Keywords if u like
Source
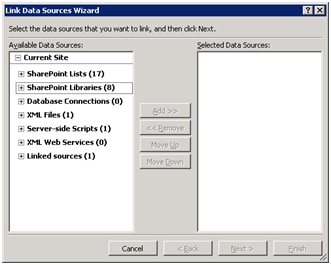
a. Click Configure Linked Source -> Pop up window will Show all the Available Data Sources as shown below
 b. Under the SharePoint Libraries -> add the two document libraries created (Test1,Test 2)
c. Click Next Button

d. Leave the default option (Merger the contents of the data sources….)
e. Click Finish and it show it as shown below.
 f. Click ok.
10. Now open the page where you want to add the web part in the designer. Then click “Click to insert a web part” option in the page.
11. In the Data Source Library under Linked Sources you will see the created (here I gave it as Multiple Document Libraries in Single List) the linked source as shown below.
 12. Click on the Drop
Down in the created Linked Source and click Show Data which will show
the “Data Source Details” as shown below.
12. Click on the Drop
Down in the created Linked Source and click Show Data which will show
the “Data Source Details” as shown below.
 13. You will see all the columns present in the Document Libraries.
14. Press CTRL and select the columns which you want to display in the Web Part.
15. Then Click on the Insert Selected Fields as… -> Select Multiple Item View
16. I have selected Name for Use in Forms, Created by and Path from the columns and inserted it in the site which is as follows.
 17. We have to format this view so that it looks good to view.
a. First Column is formatted so that select the Format as with Label
 b. Then second column created by in the same way select Format as with Label
c. Finally third column select Format as with hyperlink and give the following the pop-up window.
Address: /{@FileDirRef}
Label: {@FileDirRef}
18. We have completed creating the web part. Finally it will look as shown below.

So we are now able to list and view the documents from two document libraries as shown below !!!

In this article we will come to know how it can be done step by step.
1. The Important thing here to be noted is, whatever may be the number of Document Library going to be merged here, and it should contain the same number of columns and name.
2. If not, this web part won’t work.
3. Create two document libraries (Example : Test1,Test 2)
4. I have created 4 columns such as Type, Title, Name, and Created by in both document libraries.
5. Now, we are going to use the designer 2007 here to proceed.
6. Open the site in designer –> create an .aspx page.
7. In the right side of the designer -> go to Data Source Library -> Linked Sources
General
a. In General -> Give the Name of the web part
b. In Description-> Give the Description of your web part
c. In Key Words -> Give the Keywords if u like
Source
a. Click Configure Linked Source -> Pop up window will Show all the Available Data Sources as shown below
c. Click Next Button

d. Leave the default option (Merger the contents of the data sources….)
e. Click Finish and it show it as shown below.

10. Now open the page where you want to add the web part in the designer. Then click “Click to insert a web part” option in the page.
11. In the Data Source Library under Linked Sources you will see the created (here I gave it as Multiple Document Libraries in Single List) the linked source as shown below.


14. Press CTRL and select the columns which you want to display in the Web Part.
15. Then Click on the Insert Selected Fields as… -> Select Multiple Item View

a. First Column is formatted so that select the Format as with Label

c. Finally third column select Format as with hyperlink and give the following the pop-up window.
Address: /{@FileDirRef}
Label: {@FileDirRef}
18. We have completed creating the web part. Finally it will look as shown below.

So we are now able to list and view the documents from two document libraries as shown below !!!

Page Hit Counts and Like Buttons
Detailed Instructions available at:
Check this Link to add Hit counter and Like buttons to your SharePoint site.
Check this Link to add Hit counter and Like buttons to your SharePoint site.
Integrating Twitter and FaceBook in SharePoint
I would like to share the link which is very simple and clear way of integrating the twitter and facebook in SharePoint.
Twitter Integration
Face Book Integration
List of SharePoint 2010 Web Parts
Authoring
Content Editor
Image Viewer
Media Web Part
Page Viewer
Silverlight Web Part
Business Data
Business Data Actions
Business Data Catalog Filter
Business Data Item
Business Data Item Builder
Business Data List
Business Data Related List
Key Performance Indicators
KPI Details
Visio Graphics Service
Content Rollup
Chart Viewer
Content Query
HTML Form Web Part - Foundation
Picture Library Slideshow Web Part
RSS Viewer
XML Viewer
What’s Popular
Documents
Document ID Lookup
Document Set Contents
Document Set Properties
Relevant Documents
Filters
Choice Filter
Current User Filter
Date Filter
Filter Actions
Page Field Filter
Query String URL) Filter
SharePoint List Filter
SQL Server Analysis Services Filter
Text Filter
My Information My Calendar
My Contacts
My Inbox
My Mail Folder
My Tasks
Navigation
Categories
Site Aggregator
Sites in Category
Summary Links
Table of Contents
Tag Cloud
Office Client Applications Excel Web Access
InfoPath Form Web Part
WSRP Viewer
People
Contact Details
Profile Browser
Site Users - Foundation
User Tasks - Foundation
PerformancePoint
PerformancePoint Filter
PerformancePoint Report
PerformancePoint Scorecard
PerformancePoint Stack Selector
Search Advanced Search Box
Dual Chinese Search
Featured Content
Federated Results
People Refinement Panel
People Search Box
People Search Core Results
Refinement Panel
Related Queries
Search Action Links
Search Best Bets
Search Box
Search Core Results
Search Paging
Search Statistics
Search Summary
Top Federated Results
Creating News Aggregator Web Part
I would like to share a link which will explain step by step creation of News Aggregator WebPart for SharePoint
http://blogs.msdn.com/b/markarend/archive/2006/07/25/news-aggregator-web-part.aspx
Comments