To know about the Basics
of Lookup Columns read this article.


 The screen
shot of the created list is shown below:
The screen
shot of the created list is shown below:


Problem:
In
SharePoint the cascading or the filtered values in the lookup columns are not
present by default.
In this
article, we will achieve this using the simple JavaScript.
Solution:
Consider
the simple scenario that the user needs to input the values of Continent,
Country, State and City which has to be the filtered values.
Steps:
1. Create
four lists with the following column and corresponding types

Note:
I haven’t used the default title column for any of the lists above and I have hide it from the default view.
I haven’t used the default title column for any of the lists above and I have hide it from the default view.
To know how
to hide the default title column from the list read this article.
2. The
screen shots of the four custom lists created in the step 1 are shown below:


3. Now, we
will create another custom list for testing the cascading dropdown in the
SharePoint. Create a custom list with the following column and corresponding
types
 The screen
shot of the created list is shown below:
The screen
shot of the created list is shown below:
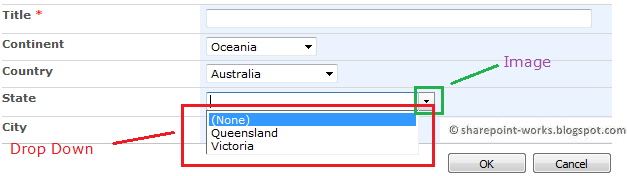
4. When we
click on the dropdowns in continent, country, state or city we will get the
unfiltered values as shown below:

5. Now we
add the java script to achieve the solution
General Code to be added:
// Execute the following JavaScript after the page has fully loaded, when it's ".ready"
$(document).ready(function(){
$().SPServices.SPCascadeDropdowns({
relationshipList: "Display Name of Master List",
relationshipListParentColumn: "Parent Column Internal Name from Master List",
relationshipListChildColumn: "Child Column Internal Name from Master List",
parentColumn: "Parent Column Display Name from List/Library",
childColumn: "Child Column Display Name from List/Library"
});
});
Description
of the code

Note:
To know how to get the Internal Name of a column in a list in SharePoint, read this article.
Download of JQuery referred in the code can be found from jquery.com and codeplex.com
To know how to get the Internal Name of a column in a list in SharePoint, read this article.
Download of JQuery referred in the code can be found from jquery.com and codeplex.com
For ease of
download for the readers, I have uploaded the script in the below links. Click to download the jquery-1.4.2.min.js and jquery.SPServices-0.5.3
min.js
Code in our case:

6. Now, we will insert this JQuery and achieve the cascading dropdown.
7. Click on New in the created custom list (Cascading Lookup Demo) as shown below:
 8. Now, we
will insert a Content Editor Web Part in the
newform.aspx to place the JavaScript code in
it.
8. Now, we
will insert a Content Editor Web Part in the
newform.aspx to place the JavaScript code in
it.


 After inserting the values the list is as follows:


To know how to insert
a web part in the NewForm.aspx without using SharePoint Designer read
this article.
9. After
inserting the web part, paste the code and save the web part.

Note:
Place Content Editor Web Part below the list form
or else the Java Script added won’t work.


10. We are
done! Now, we will check the cascading drop down. So, when the continent is selected only
countries with respect to the continent should be displayed (Filtered
values) and then the state, city in the same
case.
The results
of various scenarios are shown below:


I have
checked for the empty values scenario also. What if the child column is empty or does not contain values. Then after
inserting the value, it should add empty values in the column as shown below:


Advantages:
Ø
We
can simply achieve the cascading drop down in lookup columns in SharePoint
without using any third party tools
Ø
No
need of SharePoint designer to achieve this result
Disadvantages:
Ø
This
won’t work in the Data Sheet View since we
are inserting the J query in the aspx page only.
Ø
When
the number of items in a look up column is greater than 20 then your drop down
will change as follows:
We had more than 20 states in the
States List (28 items with lookup values)
This
happens only in the IE and not in the Chrome or any browsers.
Have a look
at the page in the Chrome Browser:

The reason
for this variations and the fix is explained well in this article. Below is the
link
Hope you
have read a nice article.
Please free to comment.
Always, your comments help me to write more.
Share this post to others if this helps you!
Note:
I have updated the code of this article on 08.06.2012 since
readers of this article requires the following:
1. What is
the case if there are more than 2 values (4 cascading or filtered values –
using more number of variables)?
2. What is
the case if there is an empty string in the child value?
3. To
explain the solution with more details for ease of reading and understanding
for the readers.
Tuesday, January 3, 2012
How to Remove “+ Add document" from a SharePoint 2010 Document Library
In previous article, we have learned how to hide the Select/ Deselect Check Box from a view in the list/libraries.
In this post, we will see how to remove the “+ Add document” option from the document library in SharePoint 2010.
We will get some scenarios where, we will display the document library I different view and in that, we don’t want this option to be shown to the users. Because, it will allow the users to upload the documents.
Suppose the below is the document library where we want to hide the Add document option

2. Using SharePoint Designer(CSS)
3. Using J Query
4. By Permission level(Default)
Add a CEWP and link the following J-Query in it and hide the CEWP webpart
$(document).ready(function()
{
$(‘#WebPartWPQ2 .ms-addnew’).hide();
});
4. By Permission Level (Default)
We can set the permission level for the document library to read only and hence the user with read only option in the SharePoint site will not see this option
We will get the following result

In this post, we will see how to remove the “+ Add document” option from the document library in SharePoint 2010.
We will get some scenarios where, we will display the document library I different view and in that, we don’t want this option to be shown to the users. Because, it will allow the users to upload the documents.
Suppose the below is the document library where we want to hide the Add document option

We can achieve this by the following methods
1. Editing the WebPart2. Using SharePoint Designer(CSS)
3. Using J Query
4. By Permission level(Default)
1. Editing the WebPart
Go to Edit WebPart -> Tool bar Type -> Select NoToolBar option which will hide the Add Document option
Go to Edit WebPart -> Tool bar Type -> Select NoToolBar option which will hide the Add Document option
2. Using SharePoint Designer(CSS)
Go to the designer and edit the page/webpart where you want to hide. Search for class=”ms-addnew” and change the style to Style=”display:none”
3. Using J QueryGo to the designer and edit the page/webpart where you want to hide. Search for class=”ms-addnew” and change the style to Style=”display:none”
Add a CEWP and link the following J-Query in it and hide the CEWP webpart
$(document).ready(function()
{
$(‘#WebPartWPQ2 .ms-addnew’).hide();
});
4. By Permission Level (Default)
We can set the permission level for the document library to read only and hence the user with read only option in the SharePoint site will not see this option
We will get the following result

Page Hit Counts and Like Buttons
Detailed Instructions available at:
Check this Link to add Hit counter and Like buttons to your SharePoint site.
Check this Link to add Hit counter and Like buttons to your SharePoint site.
SharePoint User Toolkit - A repository of scripts
SlideShow uisng J -Query and Designer
I would like to share a link which will explain step by step creation of slide show for SharePoint
Comments