# Import the .csv file, and specify manually the headers, without column name in the file
$contents = Import-CSV ‘C:\Input.csv' -header("Employee ID", "Employee Name")
# Web URL
$webURL = “SITEURL here”
$web = Get-SPWeb -Identity $webURL
$listName = "ListNameHere"
$list= $web.Lists["$listName"]
# Iterate for each list column
foreach ($row in $contents )
{
    $item = $list.Items.Add();
    $item["Employee ID"] = $row.GroupName
    $item["Employee Name"] = $row.Permissions
    $item.Update()
}
Write-Host -ForegroundColor green "List Updated Successfully"
$web.Dispose()
Event ID 28721 in Source cannot be found
Problem:I
have faced this problem when I tried to upload a document one of my
document library in SharePoint. Neither the upload is successful nor no
errors while uploading.
Event Log:I was unable to view any errors with respect to the document upload in the event log. I could see only the following logs in the event viewer:
Event Type: Error
Event Source: Windows SharePoint Services 3
Event Category: General
Event ID: 28721
User: N/A
Description:The description for Event ID ( 28721 ) in Source ( Windows SharePoint Services 3 ) cannot be found. The local computer may not have the necessary registry information or message DLL files to display messages from a remote computer. You may be able to use the /AUXSOURCE= flag to retrieve this description; see Help and Support for details. The following information is part of the event: #960013: Antivirus scanner timed out.
Following are the investigations done for fixing the errors:
1. Checked the file size limit in the web application general settings – but I have tried to upload only a few KB text file.
2. Checked the SQL server logs and there is enough space for the upload.
3. Created a new document library and tried attaching a new document which is unsuccessful.
4. Created a new list and added an item which is successful. But when tried attaching a document (or text or small file) it is unsuccessful.
Hence, I have concluded that there is no problem with SharePoint or any corruption of document library or list definition.
Looking at the event log carefully, I finally came to an idea that Antivirus is blocking something and it is where the problem is arising.
Solution:1. I have tried changing the Antivirus settings in the Central Administration
2. Go to -> Central Administration -> Operations -> Antivirus -> Antivirus Settings -> I have unchecked the option Scan Documents on Upload -> Clicked save
2. Go to -> Central Administration -> Operations -> Antivirus -> Antivirus Settings -> I have unchecked the option Scan Documents on Upload -> Clicked save

3. Now, I have tried uploading the documents in the document library
which is successful. Hence, concluding that the problem is due to the
Microsoft Fore Front Security Antivirus.
4. Note: But we cannot make this option as default, since without antivirus scan, unwanted files (viruses, malwares, spywares, etc.,) may be uploaded which would be threat to the SharePoint environment.
5. Finally, updated the Antivirus definitions and license for the Fore Front antivirus. Then onwards, the upload is successful and secured one.
Microsoft Fore Front Security Antivirus1. It is an antivirus provided by Microsoft dedicated to SharePoint environment. It will protect the SharePoint environment from the virus, spywares and other treats being uploaded.
2. To know about the Microsoft Fore Front Security Antivirus click on this link
3. In the central Administration -> Operations -> Antivirus -> Antivirus Settings -> Scan documents on upload is set, then all the documents being uploaded will be scanned by the for front and then only uploaded into the SharePoint environment.
Happy Sharing!
Hiding Default Title Column in a list in SharePoint
In this
article, we will know about a small tip, How to hide the default title column
which is created by default whenever a list is created in a SharePoint list.


 There
will be option for permanently hiding the column. Select the option “Hidden will
not appear in forms” and click OK.
There
will be option for permanently hiding the column. Select the option “Hidden will
not appear in forms” and click OK.


Steps:
1. Whenever
a list is created, you will see a default column “Title” in the list.

2. In Some
cases, we do not need this and needs that to be hidden.
3. Go to
Settings -> List Settings -> Advanced Settings (General Settings) -> Change
Allow Management of Content Types to YES

4.
Now List Settings page -> Click on ITEMS

You
will see the list of columns in the list. Now we want to hide the Title Column
and hence click on the Title column
There
will be option for permanently hiding the column. Select the option “Hidden will
not appear in forms” and click OK. 
5. We have
hid the column in the form but it will appear in the VIEW. So, we have to hide
the column in the view. Click on the View in the List.

In the
Columns Deselect the Title and click OK.

6.
When you click on New for adding a new item in the list, then you will not see
the Title column in the form or when you view the list, you will not see the
Title column in the view.
Internal Column Name in SharePoint List
In this
article, we will know how to find the Internal Column Name in a SharePoint
list.


Steps:
1. Suppose
that we have created a list with a column named “Continent” as shown below:
2. Go to
Settings-> List Settings -> Click on the Column listed in the Lists to
which you have to find the Internal Name

3. You will
be navigated to the Title Edit page which is shown below:

4. Now copy
the Browser URL (in my case is something is shown below):
http://sitename/_layouts/FldEdit.aspx?List=%7BE62DB5A7%2D12D4%2D474B%2D8EB8%2DF71DE8A86723%7D&Field=Continent
The Bolded letter is the Internal Name of the Column
(In my case Continent is the internal column name for the column Continent)
Note:
If the column name contains spaces then the Internal Name will contain some other characters. Be careful while taking handling this:
If the column name contains spaces then the Internal Name will contain some other characters. Be careful while taking handling this:
Ex:
http://SiteName/_layouts/FldEdit.aspx?List=%7B2EB82952%2D9C0B%2D4650%2DB5E9%2D22788822B1AA%7D&Field=Arrived%5Fx0020%5Fon
Here in
this name %5F is a '_'
So the
Internal Name would be Arrived_x0020_on. Here
the Column name is Arrived On but the Internal Name is different and hence
beware of this!
5. You can
find the internal name using code
also.
Ex:
string internalName = item.Fields["Field Display Name"].InternalName;
Here in the
below link you will see a list of Content types in SharePoint and the Internal
Name for it:
Please free
to comment and share this post, if this helps you!
Change the Color of a Column in a List in SharePoint
In
this article, we will know how to change the color of a column based upon the
values in the column. It is something like “Color Indicator” in SharePoint.
Scenario:
We
have a custom list used for Project Tracking. In the list, we have column named STATUS for tracking the project.
Whenever
an item in the list is updated with the status in the column, then the
background color of the status column should automatically change depending upon
the status. Hence it gives a proper UI for tracking the status.
Solution:
1.
Create a custom list named “Project Tracking System” with the columns such as
“Title”, “Description” and Status with the data type as shown below:


Columns
with the data types to be created:

2.
Now, we will insert 4-5 items in the list created.

In the
above list, we can see that the status column is updated, but it would be good
when we have background color of the each status separately. It is gives easy tracking to the users.
3. We
can achieve this through JAVA
SCRIPT
4. Add a Content Editor Web part below the list as shown below:


5.
Now in the content editor web part, add the below java script code (Open the
tool pane->Source Editor->Place the Java Script->Click Ok) and save
the page.
: Add the below code in the script Javascript tag
: Add the below code in the script Javascript tag
var colorCode = document.getElementsByTagName("td")// finding all the TD tags
var i=0;
for (i=0;i
{
if (colorCode[i].className=="ms-vb2")
{
if (colorCode[i].innerHTML=="Not Started")//finding the word to which the color has to be set
{
colorCode[i].style.backgroundColor='lightblue'; // setting the color depending upon the value
colorCode[i].style.color='Black'; // setting the color of the words inside the content
}
if (colorCode[i].innerHTML=="Started")
{
colorCode[i].style.backgroundColor='Brown';
colorCode[i].style.color='Black’;
}
if (colorCode[i].innerHTML=="In Progress")
{
colorCode[i].style.backgroundColor='Orange';
colorCode[i].style.color='Black';
}
if (colorCode[i].innerHTML=="Completed")
{
colorCode[i].style.backgroundColor='green';
colorCode[i].style.color='Black';
}
if (colorCode[i].innerHTML=="Deffered")
{
colorCode[i].style.backgroundColor='Red';
colorCode[i].style.color='Black';
}
}
}
6. Now, you can see the status column
background is changed depending upon the status inserted for each item as shown
below:
It gives good interface to the users
and also we can categorize the status easily.

Please free to comment and share the post, if it helps you!
CAML Query to Get Data from SharePoint List
To know about the Basics of the CAML query read this article.
Please free to comment and share this post if it helps you!
To know
about using CAML query builder to create
CAML queries, read this article.
In this
article, we will learn how to use CAML query in Microsoft Visual Studio
Scenario:
I have a
custom list named “Product List” with the columns named Title, Price, Quantity
and Is Available.
I want to
retrieve the products with price greater than 1000 and lesser than 10000. Then
I have to order the results depending upon the quantity in descending order.
Using the
CAML query builder, I have created a CAML query for the above scenario and the
query is as follows:
<Query><Where><And><Gt><FieldRef
Name="Price" /><Value
Type="Number">1000</Value></Gt><Leq><FieldRef
Name="Price" /><Value
Type="Number">10000</Value></Leq></And></Where><OrderBy><FieldRef
Name="Price" Ascending="False"
/></OrderBy></Query>
Implementing
CAML Query in Microsoft Visual Studio
using System;
using System.Collections.Generic;
using System.Linq;
using System.Text;
using Microsoft.SharePoint;

namespace UsingCAMLQuery
{
    class Program
    {
        static void Main(string[] args)
        {
            const string camlQuery = @"100010000";
            try
            {
                using (SPSite objSite = new SPSite("sitename"))
                {
                    using (SPWeb objWeb = objSite.OpenWeb())
                    {
                        // Building a query
                        SPQuery query=new SPQuery();
                        query.Query=camlQuery;

                        // Retrieving the data from the List
                        SPList objList=objWeb.Lists["Product List"];
                        SPListItemCollection items= objList.GetItems(query);

                        // Prinitng the header
                        Console.WriteLine("{0,-25} {1,-20} {2,-15} {3}", "Title", "Price", "Qunatity", "Is Available");

                        foreach (SPListItem objListItem in items)
                        {
                            Console.WriteLine("{0,-25} {1,-20} {2,-25} {3}", objListItem["Title"], objListItem["Price"],
                                                                             objListItem["Quantity"], objListItem["Is Available"]);
                        }

                    }
                    Console.ReadLine();
                }

            }
            catch (Exception ex)
            {
                Console.WriteLine("Error Occured:", ex.Message);
            }
            Console.ReadLine();
        }
    }
}
The full solution can be downloaded from the following link. Please free to comment and share this post if it helps you!
The list cannot be displayed in datasheet view for one or more of the following reasons in SharePoint
I was easily changing my list view by edit in data sheet view and in standard view.
After sometime, when I tried to edit a SharePoint list in DATASHEET view, I got the following error which doesn't allow me to view the list in the datasheet view and shown up a error as shown below:

Solution:
Clearly, the problem is due to some DLL's in the MS office is creating this problem.
Hence, either of the following solutions will help you to fix this error:
Microsoft Office diagnostics
Run the Microsoft office diagnostics tool by navigating to the following location:
Start -> All Programs -> Microsoft Office -> Microsoft Office Tools -> Microsoft Office Diagnostics
This will repair the office setup installed in the machine. you may see the following screens running once started

Once completed, you will see the following screen:

Installing Office2007 SharePoint Components
I read a wonderful article for this and the link is
Either of the above solutions will help you in fixing this issue.
Hope this saves some one’s time. Happy Sharing!
Using CAML Query Builder for SharePoint
To know about the Basics of the CAML query read this article.


Download Link
Use the following link to download the CAML Query builder.
How to use CAML Query Builder to create a query
Following are the steps for using the CAML query builder to create a CAML query
1. Open the CAML query
builder. Type the URL to connect to the SharePoint site and check
Credentials of the current user to login

2. Once clicked connect,
you will see the following window SharePoint site with all the lists
and libraries in the site in a tree view structure which is shown below:

3. Now we will create a new query on a list named “Product List” as shown below:

4. We will start creating a new query which is as follows:


5. You will find the query being created depending upon your selection from the list

6. Clicking on Execute, you will see the query being executed and the result is being displayed in the result tab as shown below:

The Query created is:
<Query>
<Where>
<Gt>
<FieldRef Name="Quantity" />
<Value Type="Number">0</Value>
</Gt>
</Where>
<OrderBy>
<FieldRef Name="Price" Ascending="True" />
</OrderBy>
</Query>
Hence, CAML Query Builder allows us to create the queries very easily so that it can be used in the SharePoint programming.
Now, we will have a question, how to use this query in the Visual Studio to retrieve the data from a list.
To know how to use CAML query in Visual Studio programming, read this article.
Import Excel Sheet to SharePoint List
In this article, we will learn how to export the excel data to the SharePoint list.


Steps:
1. Click on Site Actions -> More Options

2. Now click on the Lists -> Select Import Spread Sheet from the type -> then Click Create

3. Give the Name and Description of the List to be created and then browse the Excel Sheet to be uploaded

4. Clicking on Import option, you will find see a popup window opens. Select Range of Cells in the Range Type

5. This option allows you to select the table columns and rows in excel as shown below. After selecting, you will see the selected field’s column and row data being populated in the Select Range field in the popup window

6. Now click on Import
in the popup window. Your SharePoint list will be created from the
Excel Sheet and the values are also populated as shown below:

You may face some issues while importing the Excel Sheet to SharePoint and the solution is follows:
Error: “Method ‘Post’ of object ‘IOWSPostData’ failed” in SharePoint
Solution:
Ø Open the Excel Sheet Add-In EXPTOOWS.XLA which will is available at the following location C:\Program Files\Microsoft Office\Office12\1033 by default.
Ø Press Alt+F11 to display the Visual Basic code editor. Locate the form named "PublishForm" under the folder "Forms" and open the code view of this form.
Ø Search (Ctrl+F) for the line "lVer = Application.SharePointVersion(URL)" and place a new line "lVer=2" after that line.
Ø Now try to import the Excel Sheet to the SharePoint, you will not get any errors.
Error: "The specified file is not a valid spreadsheet or contains no data to import"
Solution:
This
error occurs when the site you are opening do not have permission to
file system. To give permission follow the below steps:
In Internet Explorer click Tools --> Internet Options -> Click Security tab --> Select Trusted Sites --> In the Sites add your URL here.
Now you will be able to import the file properly.
Hope this post helps you! Please free to comment and share this post.
CAML Query tutorial for SharePoint
In this article, we will understand the basics of CAML query in SharePoint.
What is CAML?
Ø CAML - Collaborative Application Markup Language
Ø XML- Extensible Markup Language based query language
Ø Used to perform a query operation against SharePoint Lists
How SharePoint List Items are retrieved?
SharePoint List data can be retrieved in any one of the following ways:
1. Using the SharePoint object model – used when code runs on the server (Example: Developing a web part or an application page)
2. Using the SharePoint Lists web service – used when your code doesn’t run on the server where the SharePoint is installed (Example: Developing a windows application)
3. Using Power shell –used mostly by the ADMIN of the SharePoint when they quickly want to retrieve some information from the SharePoint site
How does CAML query looks like?
As I already mentioned, it is XML based query language and it contains tags in it. The root element of the CAML query root element is Query. But it is not necessary to use Query element in the query you form.
Within the Query element you have two elements possible:
1. Where – to filter the data
2. OrderBy – to categorize the data
A simple structure of the CAML query is as follows:
<Query>
<Query>
<Where>
<Eq>
<FieldRef Name=”FieldName” />
<Value Type=”DataType”>Value</Value>
</Eq>
</Where>
<OrderBy>
<FieldRef Name=”FieldName” />
<FieldRef Name=”FieldName” />
</OrderBy>
</Query>
Operators in CAML Query
From the above structure, we came to know that it uses Where and OrderBy elements to retrieve the data from the list.
Let us know about the operators present in the CAML query and its usage:
Inside the Where element
1. Logical Operators - AND, OR
2. Comparison Operators - Listed Below in the table
AND – Which takes two conditions are satisfied
OR – Which takes when either of the conditions is satisfied
 Comparison Operators

Inside the OrderBy/GroupBy element
OrderBy – Which orders or sort the data depends upon the field (FieldRef element) given.
GroupBy – Which groups the data depends upon the group by field (FieldRef element) given.
Examples
Logical & Comparison Operators
Use of AND, Gt, Leq
<Query>
<Where>
<And>
<Gt>
<FieldRef Name="Quantity" />
<Value Type="Number">0</Value>
</Gt>
<Leq>
<FieldRef Name="Price" />
<Value Type="Number">2000</Value>
</Leq>
</And>
</Where>
</Query>
Use of OR, Gt, Leq
<Query>
<Where>
<Or>
<Gt>
<FieldRef Name="Quantity" />
<Value Type="Number">0</Value>
</Gt>
<Leq>
<FieldRef Name="Price" />
<Value Type="Number">2000</Value>
</Leq>
</Or>
</Where>
</Query>
Use of BeginsWith, Leq
<Query>
<Where>
<And>
<BeginsWith>
<FieldRef Name="Title" />
<Value Type="Text">M</Value>
</BeginsWith>
<Leq>
<FieldRef Name="Quantity" />
<Value Type="Number">1000</Value>
</Leq>
</And>
</Where>
<OrderBy>
<FieldRef Name="Price" Ascending="False" />
</OrderBy>
</Query>
OrderBy Operator
<Query>
<Query>
<Where>
<Or>
<Gt>
<FieldRef Name="Quantity" />
<Value Type="Number">0</Value>
</Gt>
<Leq>
<FieldRef Name="Price" />
<Value Type="Number">2000</Value>
</Leq>
</Or>
</Where>
<OrderBy>
<FieldRef Name="Price" Ascending="True" />
</OrderBy>
</Query>
Is it possible to write this queries without any errors manually?
Yes. But we will know the errors only after executing the program. Hence there is a free CAML query builder which will generate the query easily.
To know about where to download and how to use the CAML Query builder read this article.
To know how to use the CAML query in the Microsoft Visual Studio read this article.
Inserting a web part into SharePoint page without designer
In the
article “Inserting
a web part into SharePoint Page without designer”, we have discussed about
inserting a web part in New/Edit/Display from.aspx
in without using designer the lower versions of SharePoint (WSS
3.0 and MOSS
2007).


Now, in
this article we will discuss about inserting a web part into the New/Edit/Display
form.aspx page without designer in SharePoint 2010.
Now,
suppose that we have custom list named “City”

Now,
go to the List Settings of the custom list “City”

Under
General Settings -> Advanced Settings
In the
advance settings, we have an option for the Launching the forms in dialog when
click on NEW for inserting a new value in a
list.
Here, now
we will disable that option by selecting NO
in launch forms in a dialog as shown below:

Now, we
will click on “New Item” for inserting a new item in the custom list
Now, we
will be navigated to the newform.aspx without popup dialog since we
have disabled it.
The URL in
the address bar will be as below:
In the
above URL delete the URL before NewForm.aspx, we will have
In this URL
in the address bar, append “?ToolPaneView=2”
Click Go in
the address bar, then you will see the Add Web Parts option for inserting into the
newform.aspx page.

In the
similar way, we can insert the web part into editform.aspx and displayform.aspx
Cascading dropdown (or) Filtered Values in Lookup Columns in SharePoint
To know about the Basics
of Lookup Columns read this article.


 The screen
shot of the created list is shown below:
The screen
shot of the created list is shown below:


Problem:
In
SharePoint the cascading or the filtered values in the lookup columns are not
present by default.
In this
article, we will achieve this using the simple JavaScript.
Solution:
Consider
the simple scenario that the user needs to input the values of Continent,
Country, State and City which has to be the filtered values.
Steps:
1. Create
four lists with the following column and corresponding types

Note:
I haven’t used the default title column for any of the lists above and I have hide it from the default view.
I haven’t used the default title column for any of the lists above and I have hide it from the default view.
To know how
to hide the default title column from the list read this article.
2. The
screen shots of the four custom lists created in the step 1 are shown below:


3. Now, we
will create another custom list for testing the cascading dropdown in the
SharePoint. Create a custom list with the following column and corresponding
types
 The screen
shot of the created list is shown below:
The screen
shot of the created list is shown below:
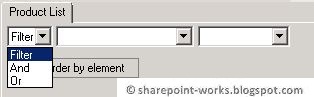
4. When we
click on the dropdowns in continent, country, state or city we will get the
unfiltered values as shown below:

5. Now we
add the java script to achieve the solution
General Code to be added:
// Execute the following JavaScript after the page has fully loaded, when it's ".ready"
$(document).ready(function(){
$().SPServices.SPCascadeDropdowns({
relationshipList: "Display Name of Master List",
relationshipListParentColumn: "Parent Column Internal Name from Master List",
relationshipListChildColumn: "Child Column Internal Name from Master List",
parentColumn: "Parent Column Display Name from List/Library",
childColumn: "Child Column Display Name from List/Library"
});
});
Description
of the code

Note:
To know how to get the Internal Name of a column in a list in SharePoint, read this article.
Download of JQuery referred in the code can be found from jquery.com and codeplex.com
To know how to get the Internal Name of a column in a list in SharePoint, read this article.
Download of JQuery referred in the code can be found from jquery.com and codeplex.com
For ease of
download for the readers, I have uploaded the script in the below links. Click to download the jquery-1.4.2.min.js and jquery.SPServices-0.5.3
min.js
Code in our case:

6. Now, we will insert this JQuery and achieve the cascading dropdown.
7. Click on New in the created custom list (Cascading Lookup Demo) as shown below:
 8. Now, we
will insert a Content Editor Web Part in the
newform.aspx to place the JavaScript code in
it.
8. Now, we
will insert a Content Editor Web Part in the
newform.aspx to place the JavaScript code in
it.


 After inserting the values the list is as follows:


To know how to insert
a web part in the NewForm.aspx without using SharePoint Designer read
this article.
9. After
inserting the web part, paste the code and save the web part.

Note:
Place Content Editor Web Part below the list form
or else the Java Script added won’t work.


10. We are
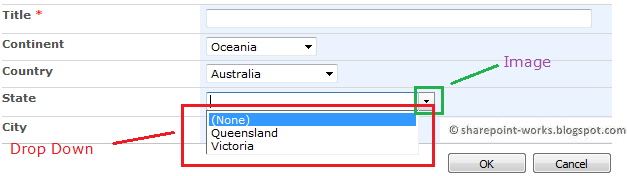
done! Now, we will check the cascading drop down. So, when the continent is selected only
countries with respect to the continent should be displayed (Filtered
values) and then the state, city in the same
case.
The results
of various scenarios are shown below:


I have
checked for the empty values scenario also. What if the child column is empty or does not contain values. Then after
inserting the value, it should add empty values in the column as shown below:


Advantages:
Ø
We
can simply achieve the cascading drop down in lookup columns in SharePoint
without using any third party tools
Ø
No
need of SharePoint designer to achieve this result
Disadvantages:
Ø
This
won’t work in the Data Sheet View since we
are inserting the J query in the aspx page only.
Ø
When
the number of items in a look up column is greater than 20 then your drop down
will change as follows:
We had more than 20 states in the
States List (28 items with lookup values)
This
happens only in the IE and not in the Chrome or any browsers.
Have a look
at the page in the Chrome Browser:

The reason
for this variations and the fix is explained well in this article. Below is the
link
Hope you
have read a nice article.
Please free to comment.
Always, your comments help me to write more.
Share this post to others if this helps you!
Note:
I have updated the code of this article on 08.06.2012 since
readers of this article requires the following:
1. What is
the case if there are more than 2 values (4 cascading or filtered values –
using more number of variables)?
2. What is
the case if there is an empty string in the child value?
3. To
explain the solution with more details for ease of reading and understanding
for the readers.
Comments